A bored network engineer caused a bit of a stir on the Internet in early 2013: they set up an IP
that when traceroute‘d returned the introductory text of Star Wars: Episode IV. Their
original implementation bounced
packets between two different routers, with a series of virtual routing tables. I don’t have access
to routers that are that configurable, but I thought this was super cool so I set out to make my own
version with just a single server in the cloud.
As a brief recap, traceroute (or tracert if you’re on Windows) is a built-in utility designed to
show you the path your packets are taking on their way to another server. For example, if you
run traceroute google.com you
can see each IP your packets hop between before reaching a Google server, as well as how long it
took to reach each of them. Day to day, I mostly use it to debug why I can’t access Australian websites:
is our ISP dropping packets, or are the trans-Pacific Internet cables having a bad day?
However, with some trickery I managed to get traceroute panic.karla.io to return some surprising
results (I’ve since taken this down, because IPv4 addresses are expensive!):
1
2
3
4
5
6
7
8
9
10
11
12
13
14
15
16
17
107.170.239.254 (107.170.239.254)  0.726 ms  0.641 ms  0.632 ms
198.199.99.233 (198.199.99.233)  0.517 ms  0.509 ms  0.401 ms
xe-0-4-0-17.r06.plalca01.us.bb.gin.ntt.net (129.250.203.81)  1.315 ms  1.436 ms  1.432 ms
ae-1.amazon.plalca01.us.bb.gin.ntt.net (140.174.21.182)  2.703 ms  39.828 ms  2.617 ms
* * *
* * *
72.21.222.19 (72.21.222.19)  2.804 ms  2.731 ms  2.752 ms
0--------------------------------------------0 (45.32.128.93)  2.959 ms  3.393 ms  3.626 ms
All.you.really.need.to.know.for.the.moment (45.32.131.117)  3.742 ms  3.775 ms  3.895 ms
is.that.the.universe.is.a.lot.more.complicated (108.61.215.165)  4.018 ms  2.854 ms  2.894 ms
than.you.might.think (45.32.215.19)  2.989 ms  3.264 ms  3.004 ms
Even.if.you.start.from.a.position.of.thinking (45.32.222.141)  2.548 ms  2.980 ms  2.591 ms
its.pretty.damn.complicated.in.the.first.place (45.32.215.2)  2.936 ms  3.251 ms  2.801 ms
Douglas.Adams (45.32.213.202)  2.884 ms  3.062 ms  3.039 ms
Mostly.Harmless (108.61.215.134)  3.157 ms  2.831 ms  3.492 ms
0--------------------------------------------0 (108.61.192.189)  3.366 ms  3.147 ms  3.090 ms
more.at.karla.io (52.9.216.11)  2.978 ms  3.107 ms  2.774 ms
Getting this to work from just one server turned out to be quite a bit more involved than I expected!
traceroute basics
I already had a reasonable understanding of how traceroute works – it sends a series of
packets with incrementing Time to live fields, so that
each hop along the way has to send a “TTL expired” message. Then, it uses the source IP of each of
those expiry messages to show you the path your packets are taking, showing the reverse DNS lookup
of each server in addition to its IP.
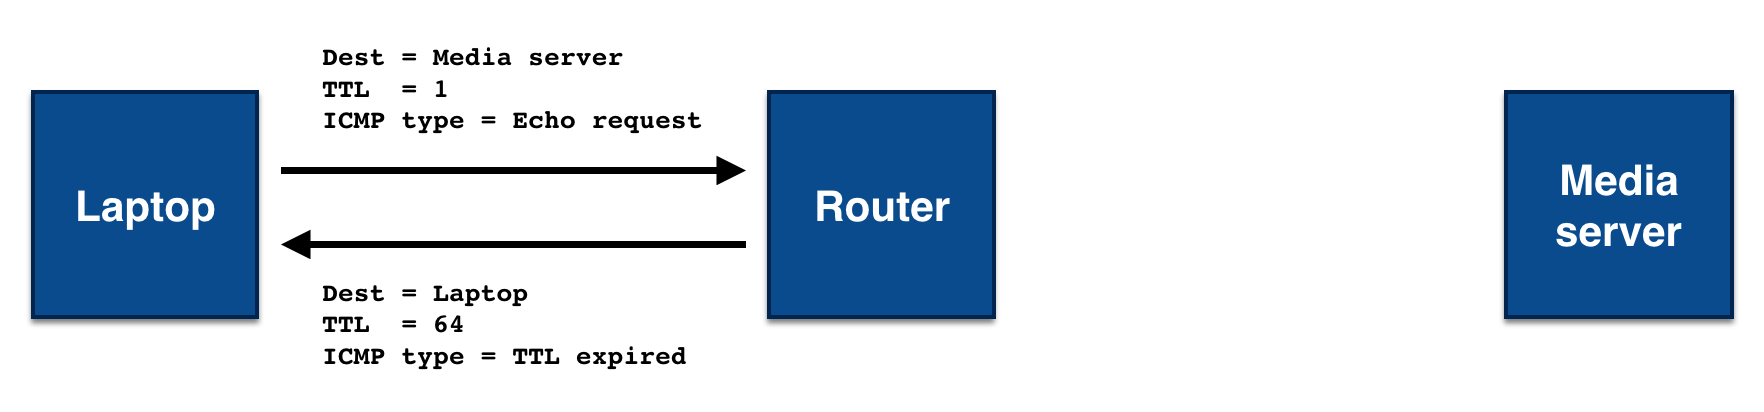
For example, if you were to traceroute a local media server from your laptop, you would initially
send a packet destined to the media server with a TTL of 1. That packet would make it one hop, to
your router, which would decrement the TTL to 0 and return a failed delivery message with the error
“TTL expired”.
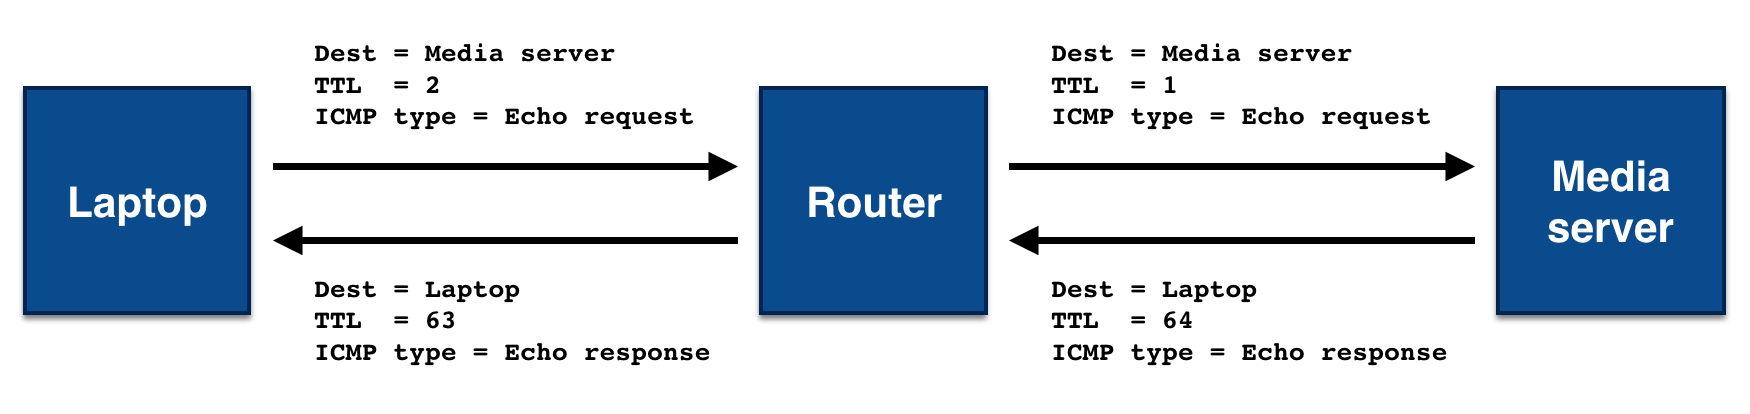
You would then increment the TTL field of the next packet to send, making it 2. That packet would
make it to the router, which would decrement the TTL to 1, and then make it one hop further, to the
media server. Since the media server is the packet’s final destination, it would send back an echo
response, rather than an error, and traceroute would stop sending packets.
In practice, nearly all destinations are more than 2 hops from you on the Internet, but the underlying principle is the same.
The thing I wasn’t sure of with traceroute was which protocol it was using for all of this.
Clearly IP was being used for the network layer, but I didn’t know which protocol was being used
inside that. A quick look at the Wikipedia page showed
that this is actually not defined! The de facto standard is that Windows uses ICMP packets, while
Linux uses UDP packets (though you ask the latter to use ICMP with traceroute -I). In practice, it
makes little difference which packet type you use – TTL expired messages are always over ICMP,
so the protocol choice only changes the success message that’s sent by the destination server. If
you use ICMP traceroute, you’ll get back an ICMP “echo response”, while UDP traceroute will get
you an ICMP “destination port unreachable” message.
Lying to traceroute
Now the fun part, figuring out how to make traceroute do what I wanted instead! Since I would be
running this from just the one server, I’d need to do a fair amount of lying:
- my server would need to return multiple different results to
traceroute, - each of those results would need to have a different IP, and
- each of those IPs would need to have reverse DNS entries without a forward pointing (normal) DNS record.
My plan for returning multiple results was to use the TTLs of the original packets received to determine the response I should be sending. I’d need to spoof the source IPs for each of those responses to get the different IPs, and would need to find some way to set up reverse DNS for each of them.
Networking in Python
I decided my first goal would be to get traceroute to output the same line multiple times. That
meant returning TTL expired packets from the destination host a few times, before returning a
success packet – it was time to start writing Python networking code!
I also decided to start by handling ICMP traceroute, since then all of the messages I’d need to
send and receive would be the same protocol. That meant my first step was to figure out how to get
Python to listen for ICMP packets, rather than the usual TCP or UDP packets. Some Googling led me to
the socket.IPPROTO_ICMP option with the socket.SOCK_RAW type, giving me the following code that
let me see ICMP echo requests (i.e. ping requests) being made to my server:
import socket

sock = socket.socket(socket.AF_INET, socket.SOCK_RAW, socket.IPPROTO_ICMP)
while True:
  data, (addr, port) = sock.recvfrom(1024)
  print repr(data)
Helpfully, the socket.SOCK_RAW option meant I’d see the entire original IP packet, so it was easy
to extract the TTL of the packet that was sent. Unhelpfully, it also meant I’d need to parse the
contents of the packet myself. I searched for an existing Python library that did this, but found
nothing other pcap parsing libraries, so I settled down and wrote a very basic parser and packet
generator of my own.
Once I could successfully parse messages, it was time to start replying to them! Linux really wants
to help you out when it comes to ICMP, and the kernel will automatically respond to ping requests
on your behalf unless you tell it otherwise. Linux has a convenient sysctl that you can use to
control this behavior: setting /proc/sys/net/ipv4/icmp_echo_ignore_all to 1 disables ICMP
replies.
With this option turned on, ping stopped working completely on my server and I was in control. A
small bit of TTL checking logic later, and I was able to repeat the final line of traceroute as
many times as I wanted. Part one of three complete!
import socket

sock = socket.socket(socket.AF_INET, socket.SOCK_RAW, socket.IPPROTO_ICMP)
while True:
  data, (addr, port) = sock.recvfrom(1024)
  ip_packet = parse_ip_packet(data)

  if ip_packet.ttl < 4:
    send_ttl_expired(addr)
  else:
    send_echo_response(addr)
NAT NAT NAT
Next up was controlling not only the number of lines output by traceroute, but also the IPs on
those lines. That meant faking the source IP of the “TTL expired” packets I was sending.
The source IP of the packet is stored in the IP header, so I turned on the socket.IP_HDRINCL
socket option to tell the kernel that we’d be adding the IP headers ourselves, and that it shouldn’t
do so on our behalf. Some tweaking later, and… it didn’t work. I fiddled with the code a
bunch, and still no luck – tcpdump would show packets leaving the server, but they’d never
make it back to my laptop.
A bunch of investigation and time spent staring at pcaps later, I decided that the issue had to be NAT. NAT dynamically rewrites packets as they flow through your network, and is commonly used in both home networking and in data centers, to give the appearance of having a globally unique IP when that isn’t actually the case.
Comparing the packets leaving my machine to those arriving on the server, it was clear that they were being rewritten along the way. Since the packets were being rewritten on their way into the server, they’d also need to be rewritten on the way out. Unfortunately, this made spoofing the source IP impossible, since when a spoofed packet arrived at the router, the router had no way to know who sent the packet, and would drop it.
This ruled Digital Ocean out of the hosting providers I could use. I tested a number of others, and eventually figured out that AWS would let me spoof source IPs if I turned off the “Source/Dest Check”. With interim routers no longer a problem, I was up and spoofing IPs – nearly there!
import socket

IPS = [
  '123.1.1.1',
  '123.1.1.2',
  '123.1.1.3',
]

sock = socket.socket(socket.AF_INET, socket.SOCK_RAW, socket.IPPROTO_ICMP)
while True:
  data, (addr, port) = sock.recvfrom(1024)
  ip_packet = parse_ip_packet(data)

  if ip_packet.ttl <= len(IPS):
    send_ttl_expired(addr, IPS[ip_packet.ttl - 1])
  else:
    send_echo_response(addr, ip_packet.dest_ip)
Reverse DNS
The last thing I needed to get set up for my ICMP proof of concept was the reverse DNS records.
These would change the text that was being shown by traceroute, and complete the trick!
Deceptively, per the RFC, reverse DNS records
aren’t required to match the normal DNS records for the same IPs. That means that example.com can
point to 1.2.3.4, while 1.2.3.4’s reverse DNS lookup can instead point to other-example.com.
In fact, a reverse DNS lookup is just a special type of normal DNS lookup.
Say you wanted to lookup the reverse DNS for the IP 52.9.216.11, which you could do by running
nslookup 52.9.216.11. In reality, this is doing a DNS lookup on the domain
11.216.9.52.in-addr.arpa, then fetching the PTR record there. The in-addr.arpa host is a special
domain used for reverse DNS lookups, while the first part of the hostname is the IP address
backwards. You can try this yourself by running dig -t PTR 11.216.9.52.in-addr.arpa!
Unfortunately, while nothing in the protocol enforces that a forward pointing DNS entry must exist in order to set up a reverse DNS entry, a number of providers do have this requirement, including AWS. That meant I could use them for the final line of my output, but none of the rest, so I began my search for another IP address provider.
Due to IPv4 address exhaustion most providers limit the number of IP addresses they’ll allow you to purchase, but I eventually stumbled across Vultr. While a little sketchy looking, they would sell me as many IPs as I wanted (for $3/month each) and would let me set up arbitrary reverse DNS entries in their web console.
I signed up for an account, bought myself a few IPs, set up their reverse DNS, waited a few hours for DNS to propagate, and had a working proof of concept!
UDP
With ICMP traceroute working, it was time to get my implementation working with UDP. traceroute
typically uses ports around 33400, but that wasn’t guaranteed, so I needed to figure out how to
listen on all UDP ports. Several fruitless Google searches later, and I decided to just give it a
go. This worked great! It turns out that when you’re listening on a raw socket, as I was, ports
disappear entirely, and you see every message!
That was the end of my good luck though, after that I ran into a huge hurdle – how to get the
Linux kernel to stop being helpful. As with ICMP echo requests, the kernel automatically responds
to UDP requests destined to ports with no program listening on them, letting the sender that the
destination port is unreachable. In nearly all cases this is what you want, but in mine it meant I
was racing the kernel to respond to the traceroute packets.
I thought there would be a sysctl to disable sending these packets, and I was right, there was! In
FreeBSD. Unfortunately, for an assortment of coherent reasons the blackhole sysctl never made it into
Linux mainstream, which was a bit of a problem. I tried moving my code over to FreeBSD, but I have
no experience with the operating system, so didn’t want to maintain a server running on it.
I spent a few days thinking about the best way to solve this problem, and came up with a pretty
hacky workaround. Linux has a utility called iptables
that lets you control the kernel-level firewall. I could configure the outbound firewall to block
“destination port unreachable” messages sent by the kernel, while allowing those same packets if
they were sent from userspace.
In practice, this meant setting up iptables as follows:
# Allow all outbound messages, except "destination port unreachable"
iptables -A OUTPUT -p icmp -m icmp ! --icmp-type port-unreachable -j ACCEPT

# For outbound "destination port unreachable" messages, drop all messages
# except those sent by root
iptables -A OUTPUT -p icmp -m owner ! --uid-owner root -j DROP
Though a little unclean, this did successfully get Ubuntu to stop sending “destination port
unreachable” messages for me. I added in support for parsing and generating UDP packets, did some
refactoring, and had an implementation that worked for both UDP and ICMP traceroute! Success!
Running your own
A secondary goal of this project was to make it easy for other people to run their own copy of this, and to make it relatively cheap to do so. Using a single cloud server means it costs around $5/month, and each IP you use costs $3/month. In theory, it’s possible for you to run this script on an existing server and using IPs you already own (but don’t care about the reverse DNS records for), in which case the cost drops to free.
While I think this code should play nicely with other ICMP and UDP traffic on the same box, I make
no guarantees, except that strange things will happen if you’re more than (64 - number_of_lines)
hops away from a legitimate user.
It’s also worth noting that this code currently only supports IPv4, not IPv6 requests. I’m planning to add support for the latter soon, but restricting access to only IPv6 would have locked most of my Australian friends out of playing with this.
You can find the source code, along with instructions on how to set up your server, over on GitHub: https://github.com/tetrakai/scuttle. Have fun!