In May last year, a new attack on the Diffie Hellman algorithm was released, called Logjam. At the time, I was working on a security team, so it was our responsiblity to check that none of our servers would be affected. We ran through our TLS config and decided it was safe, but also needed to check that our SSH config was too. That confused me – where in SSH is Diffie Hellman? In fact, come to think of it, how does SSH work at all? As a fun side project, I decided to answer that question by writing a very basic SSH client of my own.
My goal was to connect to an SSH server I owned and to run an arbitrary command, say cating a file.
It sounded easy, maybe the work of a weekend. That estimate ended up being a total lie.
I started off by finding the SSH RFC. Or, well, it turns out there are at least four of them:
- RFC 4251 - overall architecture
- RFC 4252 - user authentication protocol
- RFC 4253 - transport protocol
- RFC 4254 - connection protocol
That looked like way more reading than I was willing to do for this project, so I nc‘d to port 22
(the standard SSH port) on a server I controlled. It sent back the banner
SSH-2.0-OpenSSH_6.9p1 Ubuntu-2ubuntu0.1, which was the format described in the transport protocol
RFC. Great, that was where I’d start!
Banner message
I skim read the top section of the RFC, then started at section 4.2
which describes this banner message. It’s actually used to negotiate the protocol version the client
and server will be speaking: the first section (SSH-2.0) describes the SSH version, the second
(OpenSSH_6.9p1) the software version, and the last (Ubuntu-2ubuntu0.1) is an optional comment
that can be used to further identify the software.
The transport protocol doesn’t cover who sends their banner first, so you can send yours as soon
as you’ve opened a connection. You can even give this a shot yourself by running nc $HOSTNAME 22,
and replaying the banner it sends you.
Algorithm negotiation
Once you’ve told the server that you speak SSH 2.0, it sends back a pretty long blob:
'''
\x14\xd5\x1dc\x93\x1d\t\xa7\x8d\x0ek\xc62r\xf5\xf3\xe0\x00\x00\x00\x96curve25519-sha256@libssh.
org,ecdh-sha2-nistp256,ecdh-sha2-nistp384,ecdh-sha2-nistp521,diffie-hellman-group-exchange-sha2
56,diffie-hellman-group14-sha1\x00\x00\x00/ssh-rsa,ssh-dss,ecdsa-sha2-nistp256,ssh-ed25519\x00
\x00\x00lchacha20-poly1305@openssh.com,aes128-ctr,aes192-ctr,aes256-ctr,aes128-gcm@openssh.com,
aes256-gcm@openssh.com\x00\x00\x00lchacha20-poly1305@openssh.com,aes128-ctr,aes192-ctr,aes256-c
tr,aes128-gcm@openssh.com,aes256-gcm@openssh.com\x00\x00\x00\xd5umac-64-etm@openssh.com,umac-12
8-etm@openssh.com,hmac-sha2-256-etm@openssh.com,hmac-sha2-512-etm@openssh.com,hmac-sha1-etm@ope
nssh.com,umac-64@openssh.com,umac-128@openssh.com,hmac-sha2-256,hmac-sha2-512,hmac-sha1\x00\x00
\x00\xd5umac-64-etm@openssh.com,umac-128-etm@openssh.com,hmac-sha2-256-etm@openssh.com,hmac-sha
2-512-etm@openssh.com,hmac-sha1-etm@openssh.com,umac-64@openssh.com,umac-128@openssh.com,hmac-s
ha2-256,hmac-sha2-512,hmac-sha1\x00\x00\x00\x15none,zlib@openssh.com\x00\x00\x00\x15none,zlib@o
penssh.com\x00\x00\x00\x00\x00\x00\x00\x00\x00\x00\x00\x00\x00
'''
There’s definitely some binary encoding going on, but also some readable ASCII strings in there. So it was back to the RFC to figure out what all that data meant.
Skimming over some text about backwards compatibility brought me to section 6, which describes the binary packet protocol. Decoding the message with that, and after some more skimming, I found the key exchange algorithm negotiation section.
It turns out that SSH, like many other protocols, doesn’t actually do any cryptography of its own. Instead, the protocol defines a series of underlying algorithms that are used to guarantee the secrecy and authenticity of your connection. In fact, SSH negotiates separate algorithms for:
- key exchange (how you and the server agree on a shared key, that no one else knows),
- host key authentication (how you know you’re talking to the right server),
- encryption, in each direction (how you stop someone eavesdropping),
- MAC, in each direction (how you prevent someone from tampering with your messages), and
- compression, in each direction.
It also allows negotiation of the human language each side should speak, though as far as I could tell, this is ignored by OpenSSH.
Once we send back our own list of algorithms, the key exchange begins for real. Well, that’s what happens if the client and server can agree on algorithms. I had a lot of trouble with the server deciding my algorithm list was invalid, so I opened up Wireshark and sniffed the negotiation for a standard SSH client.
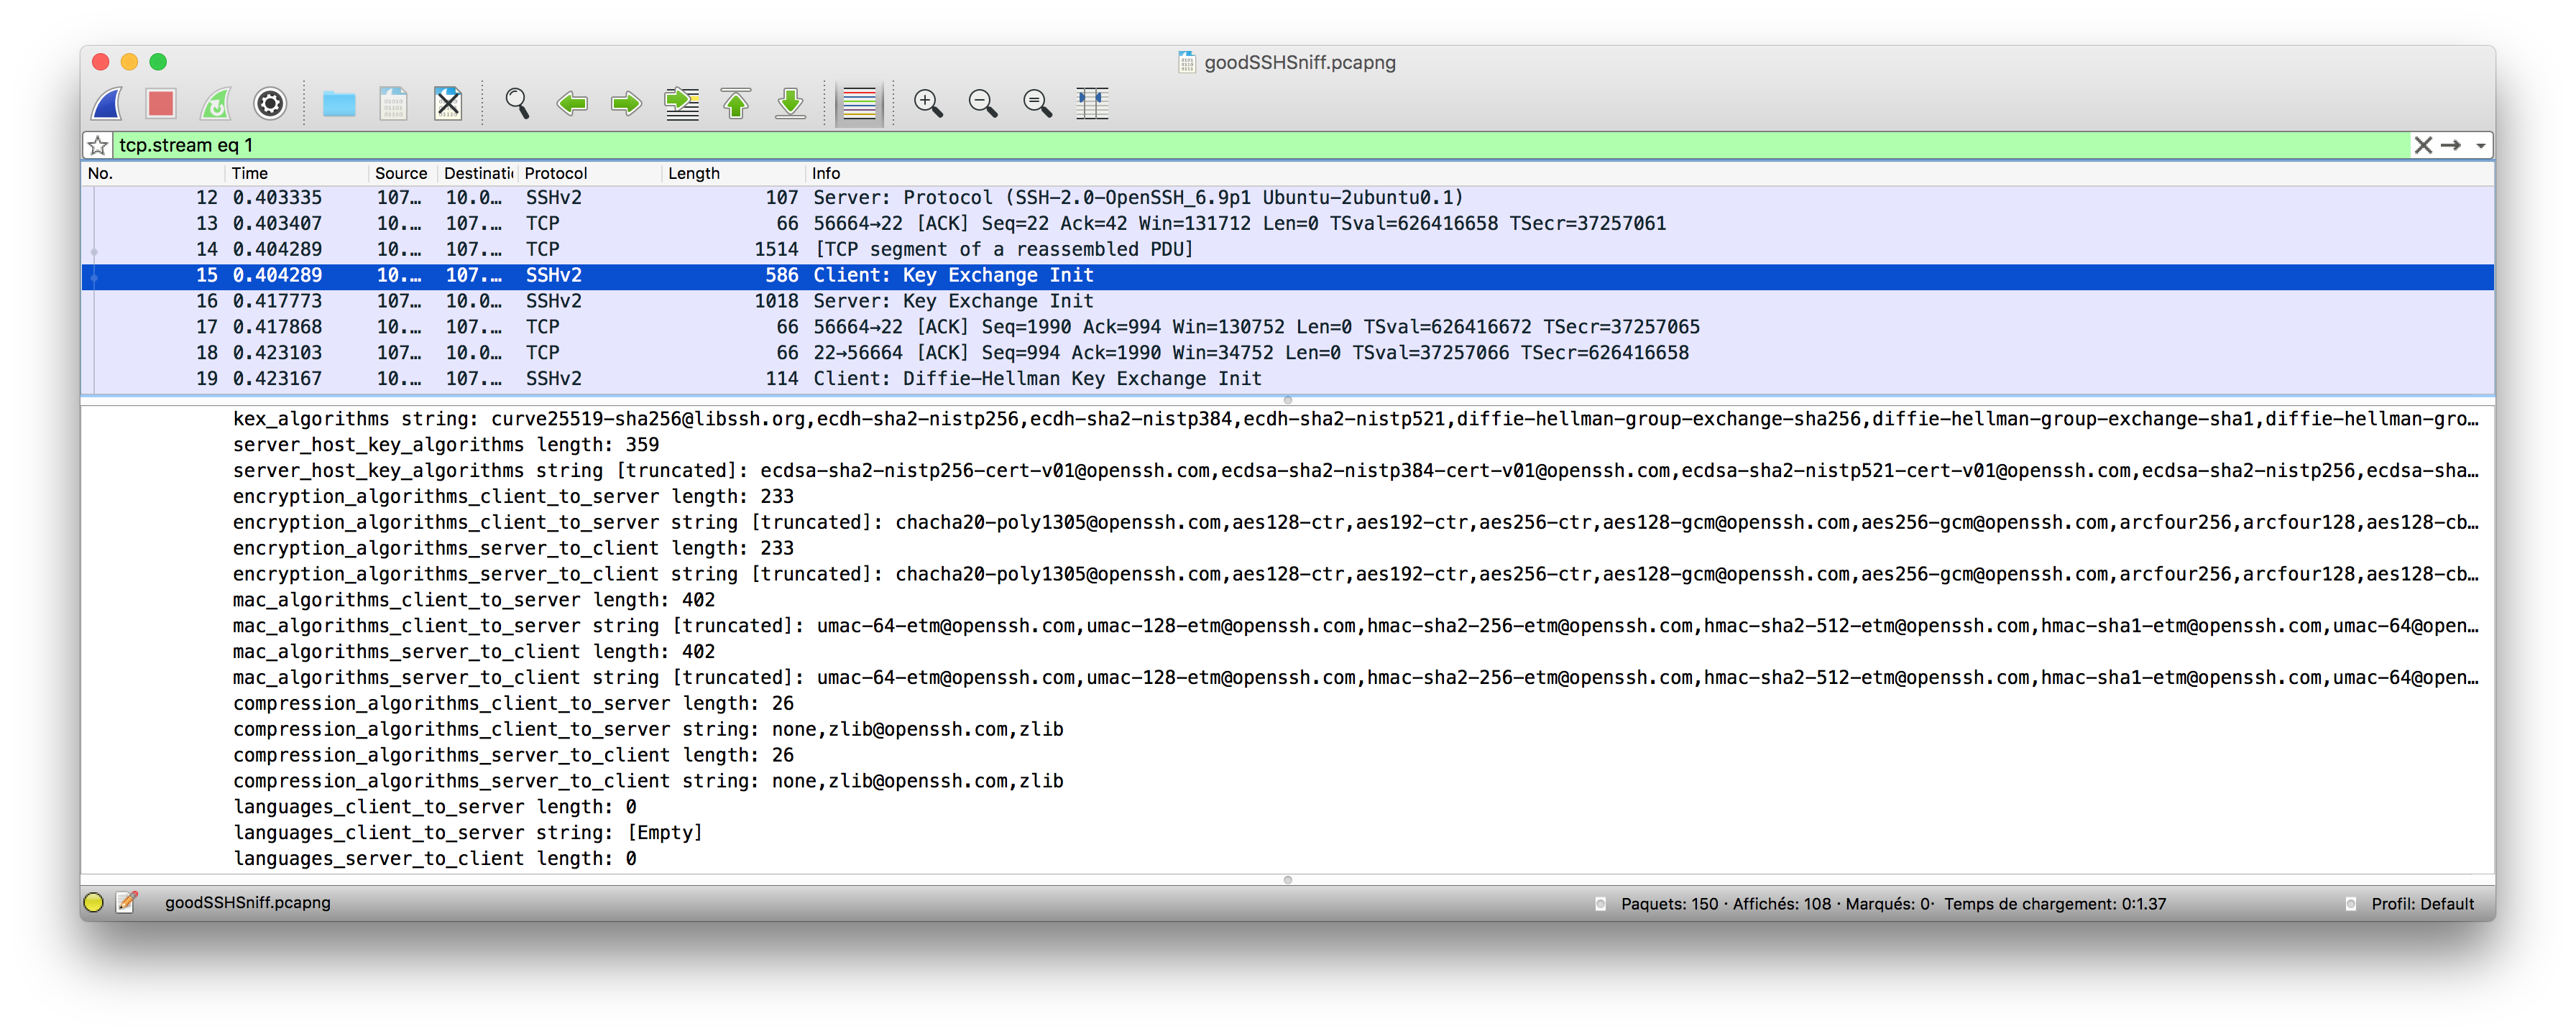
After some debugging, and a lot of packet captures, I settled on the simplest set of algorithms I could get to work:
- Diffie Hellman for key exchange,
- ECDSA SHA-2 with the NIST P-256 curve for host key authentication (since I couldn’t convince the server to speak anything other than Elliptic Curve crypto for this),
- AES-128 CTR as an encryption algorithm,
- HMAC SHA-1 as the MAC algorithm, and
- “none” as my compression algorithm.
Exchanging keys with Diffie Hellman
Now I was getting to the challenging part – actual key exchange! This is where the client and server agree on a secret that’s used for the remainder of the session. I’d decided to use Diffie Hellman, both because it was what got this whole thing started, and because it was one of the only algorithms my server supported that was documented in the original RFC.
Diffie Hellman’s security is derived from the hardness of the discrete logarithm problem.
Essentially, if you raise one number to the power of another (mod a third), then given the base and
the result, it’s very difficult to find the exponent. In this particular case, I’d decided to use
Diffie Hellman group 14, which is simply a
particular set of base, mod, and field size numbers. Implementing this in Python is pretty easy –
you generate a random number, run the pow function with the paramaters given, and you have a
shared key.
# Diffie Hellman key exchange (group 14)
# g is the base, p is the mod, and q is the field size
g = 2
p = 0xFFFFFFFFFFFFFFFFC90FDAA22168...
q = 2 ** 2048

x = random.SystemRandom().randint(2, q - 1)
e = pow(g, x, p)

# Send e to the server
# Receive f from the server

shared_key = pow(f, x, p)
Verifying the server’s identity
Once I’d generated a shared key, I needed to make sure I was actually talking to the right server, not an imposter. In SSH, that’s done by having the server sign all data sent so far in the connection with its private key, and having the client verify that with a known public key.
Unfortunately for me, the server was running a fairly new version of OpenSSH, which meant it would only verify its identity using ECDSA. I don’t fully understand elliptic curve cryptography, but helpfully Python has an ECDSA module that could do the hard work for me. Unhelpfully, it takes signatures in a different, and as far as I can tell undocumented, key format.
With some guesswork, I discovered that this format seemed to be just the raw bytes of the r and
s, the two components that make up an ECDSA key. Unfortunately, these both needed to be 32 bytes
long, and for some reason, I’d occasionally find that they had an extra byte! This meant that
signature verification would only work around one in every four times.
A closer reading of the spec proved helpful here, in particular of RFC 4251,
the “overall architecture” RFC that I’d skipped earlier. r and s were being sent as mpints, or
“multiple precision integers”. I’d assumed that these were unsigned integers in network byte order
(that is, big endian), however they’re actually encoded using two’s complement. This means that the
first bit of the number determines the sign, so to encode a 32 bit unsigned integer with its high
bit set, you need to add a leading 0x00 byte.
def twos_complement(byte_array):
  byte_array = [bitflip_byte(b) for b in byte_array]

  i = 0
  while byte_array[i] == '\xff':
    byte_array[i] = '\x00'
    i += 1
  byte_array[i] = struct.pack('B', struct.unpack('B', byte_array[i])[0] + 1)

  return byte_array

def bitflip_byte(data):
  return struct.pack('B', (~struct.unpack('B', data)[0]) % 0x100)
Implementing two’s complement in Python was more involved than it probably should have been, but
once I was parsing mpints correctly, I could reliably verify signatures! These were being verified
against the public key the server presents, but I still needed to check that the public key really
was for that server.
The SSH spec is intentionally lenient here – all current key distribution systems have substantial
drawbacks, so the default is to allow users to accept arbitrary public keys the first time they
connect, and then warn them if these keys change. That’s the “Are you sure you want to continue
connecting (yes/no)?” you see whenever you try to SSH to a new server!
I went down a bit of a rabbit hole here, duplicating the behavior of my local OpenSSH client: adding
new host keys to ~/.ssh/known_hosts file, and checking for existing keys there. However, with that
done, key exchange was over, and we were ready to move on to actually sending data!
Encrypting and authenticating messages
From here on in, all the messages sent between the client and server were encrypted and authenticated. That rendered Wireshark useless for debugging, since it works by intercepting the connection.
This was a problem, because my initial packets to the server were met with immediate disconnects,
and I’d now lost my main means of debugging. I banged my head against the wall for a while, then at
the suggestion of a friend, decided to turn the server’s OpenSSH log verbosity way up. I bumped the
LogLevel in /etc/ssh/sshd_config to DEBUG3, and suddenly I was getting helpful error
messages!
The bug turned out to be minor (a missing value for key derivation), however this led me to the most fun part of the SSH spec, the hard-coded alphabet! As already mentioned, SSH relies on a number of other cryptographic primitives, each of which needs its own separate key. In fact, SSH needs six separate pseudo-random values, each of which it derives from the originally negotiated shared key.
SSH uses a well-known property of cryptographic hash functions, called the avalanche effect, to derive these keys. This property says that small changes in input value lead to large changes in output value. By adding a single extra byte to the shared key, we can generate a completely different key. In the case of SSH, the spec actually hard-codes the ASCII values “A” through “F” for this. Nothing is wrong with that from a security perspective, but it’s adorable to know that those values exist in every SSH connection you make:
Initial IV client to server: HASH(K || H || "A" || session_id)
  (Here K is encoded as mpint and "A" as byte and session_id as raw
  data.  "A" means the single character A, ASCII 65).
User authentication
With encryption and authentication going, I now had a working transport layer to start building on!
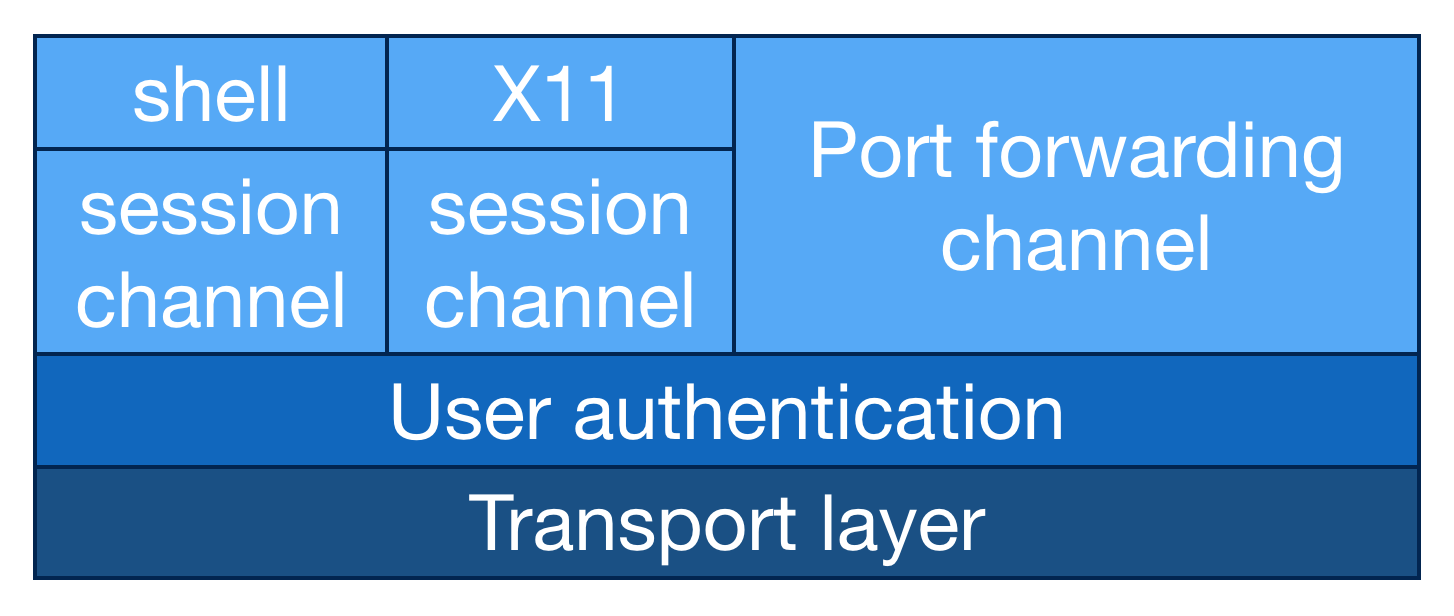
Like the OSI network model, SSH is also layered - inside the basic transport protocol, which guarantees confidentiality and authenticity, we can run other, more complex protocols. The first one of these that we need to run in order to do anything is the “ssh-userauth” protocol. This authenticates the client to the server, and it’s the reason why you pass a username as part of SSHing to a server.
There are several ways to authenticate an SSH user, some of which you’ve likely used before:
password, public key, and host-based authentication are all supported. For my client, I decided to
go with public key authentication, since that’s what I use day to day. To do this, I needed to sign
a message with the private key corresponding to a public key that I’d granted access to the server.
In practice, this meant cracking open my ~/.ssh/id_rsa file! Or, trying to – my private key is
stored in a password-protected file, and the version of PyCrypto I was using didn’t seem to be able
to parse the format.
I generated a new key pair (this time stored in plaintext) added the public half as an authorized
key to the server I was using, and then tried authenticating. No luck. I skimmed through the
PyCrypto RSA encrypt documentation a few times before noticing the very obvious Attention banner that said I shouldn’t be calling this function
unless I really knew what I was doing. It turns out that so-called “textbook RSA” has a number of
undesirable properties,
and that you nearly always want to pad your data. With the right padding in place, I got an
SSH_MSG_USERAUTH_SUCCESS message, and we were away!
Getting a shell
Now that I’d authenticated, there was only one step to go, launching a shell! Like all things SSH, this was a little more complicated than it first sounded. SSH uses a concept called “channels” – essentially, it’s possible to run multiple logical connections over the one transport connection. This means you could, for example, run an SSH shell, forward X over SSH, and forward a port over SSH, all with the same connection.
So, to get to a shell, the first thing I needed to do was to open a channel. Since I’d be dynamically interacting with the channel, I needed to open an interactive session, then pivot this into a shell. Initially, I’d open a channel with the “session” type, then I’d request that a particular program be launched on the server-side. In this case, I requested a shell, but you can also run arbitrary commands on the server, pass environment variables, or any number of other fun things.
With a shell launched server-side, I finally got back the message I’d been hoping for – the Ubuntu
welcome banner! I was surprised to see that a prompt wasn’t being sent over the wire, but wrote a
simple read-eval-print loop that let me run arbitrary commands on my remote server. I successfully
cated a file, and could also use pipes to create my own on the server. Mission accomplished!
Finishing up
I’ve refactored my code a little to make it easier to read, but you can find my client, along with inline documentation, over on GitHub: https://github.com/tetrakai/ssh_client.
My “weekend” project ended up taking more like weeks, but I learned a ton about how SSH worked in the process! I hadn’t realized that the protocol was as layered as it actually was, that client authentication happened completely separately to host authentication, or that it was possible to multiplex connections. Not to mention, I finally figured out where the Diffie Hellman was!